ch2.pretrained_network
Ch 2. Pretrained networks
Exploring Pretrained Models in PyTorch
Impact of Deep Learning on Computer Vision
- Deep learning has revolutionized computer vision, driven by:
- The need for image classification and interpretation.
- Availability of large-scale datasets.
- Advances in convolutional layers and GPU acceleration.
- Interest from tech giants in understanding user-generated images.
Using Pretrained Models
- A pretrained neural network functions like a program that maps inputs (images) to outputs (labels, captions, or new images).
- Benefits of using pretrained models:
- Leverages expert-designed architectures.
- Saves computation time—no need to train from scratch.
- Provides a strong starting point for deep learning projects.
Importance of Running Pretrained Models
- Useful for evaluating, visualizing, and using deep learning models in real-world applications.
- Prepares users for working with real data and model outputs, regardless of whether they trained the model themselves.
- Learning PyTorch Hub helps efficiently access and share models through a unified interface.
Types of Pretrained Models Explored
- Image Classification Models – Identify objects in images.
- GANs (Generative Adversarial Networks) & CycleGAN – Generate new images from existing ones.
- Image Captioning Models – Generate descriptive text from images.
Using Pretrained Networks for Image Recognition in PyTorch
Pretrained Networks and ImageNet
- Pretrained deep learning models are widely available through repositories, often published alongside research papers.
- The ImageNet dataset (http://imagenet.stanford.edu) contains 14+ million labeled images and serves as a benchmark for image classification models.
- The ImageNet Large Scale Visual Recognition Challenge (ILSVRC) has driven improvements in:
- Image classification (identifying object categories).
- Object localization (detecting object positions in images).
- Scene classification and parsing (segmenting images into meaningful regions).
- Models trained on ImageNet classify images into 1,000 categories and return the top 5 predictions ranked by confidence.
Loading Pretrained Networks in PyTorch
Obtaining a Pretrained Model
-
The TorchVision project (https://github.com/pytorch/vision) provides access to state-of-the-art computer vision models like:
- AlexNet (http://mng.bz/lo6z)
- ResNet (https://arxiv.org/pdf/1512.03385.pdf)
- Inception v3 (https://arxiv.org/pdf/1512.00567.pdf)
-
TorchVision’s
modelsmodule makes it easy to load these pretrained networks:from torchvision import models dir(models)- The uppercase names represent model classes (e.g.,
AlexNet,ResNet). - The lowercase names are convenience functions for instantiating specific versions (e.g.,
resnet101loads a 101-layer ResNet).
- The uppercase names represent model classes (e.g.,
AlexNet: A Historic Breakthrough in Deep Learning
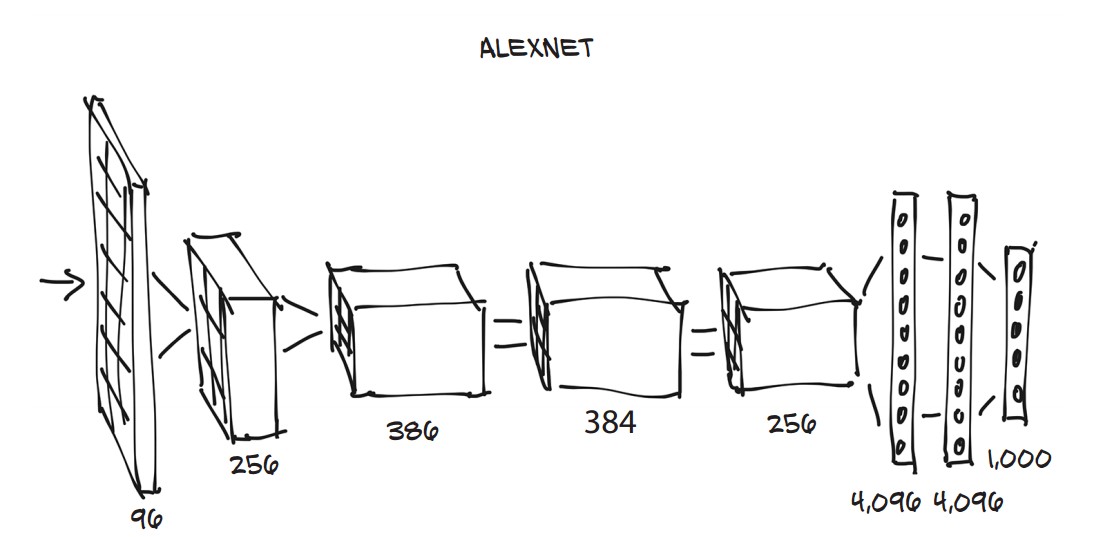
-
Won the 2012 ILSVRC competition with a top-5 error rate of 15.4% (compared to 26.2% from non-deep learning models).
-
Marked a turning point for deep learning in computer vision.
-
Structure:
- Five convolutional layers.
- Fully connected layers converting the image into 1,000 class scores.
-
Loading AlexNet in PyTorch:
alexnet = models.AlexNet()
ResNet: Deep Networks with Residual Connections
-
ResNet-101 introduced residual connections, solving the problem of training deep networks.
-
Won multiple ILSVRC competitions in 2015.
-
Loading a Pretrained ResNet Model:
resnet = models.resnet101(pretrained=True) -
ResNet-101 has 44.5 million parameters, requiring extensive computation during training.
-
Viewing Model Architecture:
print(resnet)- Modules (layers) include:
Conv2d: Convolutional layer.BatchNorm2d: Batch normalization.ReLU: Activation function.MaxPool2d: Pooling layer.fc: Fully connected layer producing 1,000 class scores.
- Modules (layers) include:
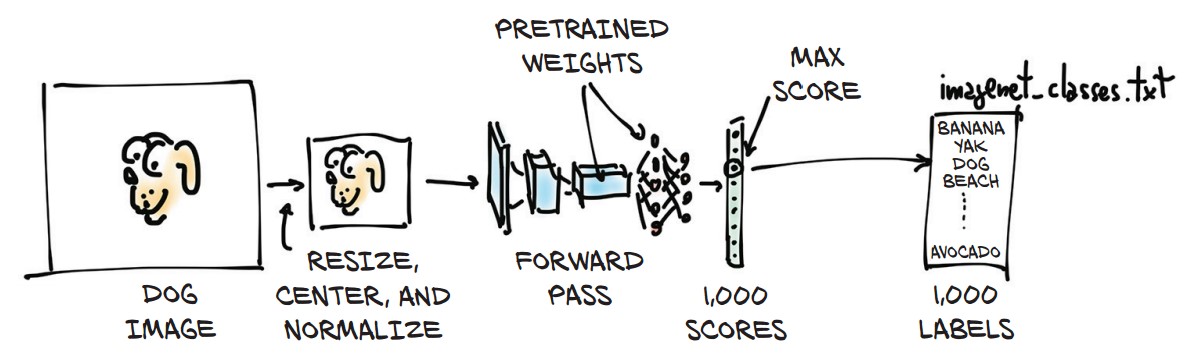
Preprocessing Images for Model Input
-
Input images must be resized, cropped, normalized, and converted into tensors.
-
Using
torchvision.transformsfor preprocessing:from torchvision import transforms preprocess = transforms.Compose([ transforms.Resize(256), transforms.CenterCrop(224), transforms.ToTensor(), transforms.Normalize(mean=[0.485, 0.456, 0.406], std=[0.229, 0.224, 0.225]) ]) -
Loading and Preprocessing an Image:
from PIL import Image img = Image.open("../data/p1ch2/bobby.jpg") img_t = preprocess(img) -
Adding a Batch Dimension for Model Input:
import torch
batch_t = torch.unsqueeze(img_t, 0)
Running Inference on a Pretrained Model
-
Set the model to evaluation mode before running inference:
resnet.eval() -
Performing a Forward Pass on the Image:
out = resnet(batch_t) -
Output: A tensor of 1,000 class scores.
Decoding the Model's Prediction
-
Loading the ImageNet class labels:
with open('../data/p1ch2/imagenet_classes.txt') as f: labels = [line.strip() for line in f.readlines()] -
Finding the Predicted Label:
_, index = torch.max(out, 1) labels[index[0]] -
Computing Confidence Scores:
percentage = torch.nn.functional.softmax(out, dim=1)[0] * 100
labels[index[0]], percentage[index[0]].item()
Example Output:
('golden retriever', 96.29) -
Retrieving the Top 5 Predictions:
_, indices = torch.sort(out, descending=True)
[(labels[idx], percentage[idx].item()) for idx in indices[0][:5]]
Example Output:
[ ('golden retriever', 96.29), ('Labrador retriever', 2.80), ('cocker spaniel', 0.28), ('redbone', 0.20), ('tennis ball', 0.11) ]- Observations: The model correctly identifies the dog breeds but also suggests "tennis ball," possibly due to bias in training data.
-
Experimenting with Different Images:
- The model performs well on common objects seen in training but may misclassify unseen objects.
The GAN Game: Generative Adversarial Networks (GANs)
Understanding GANs
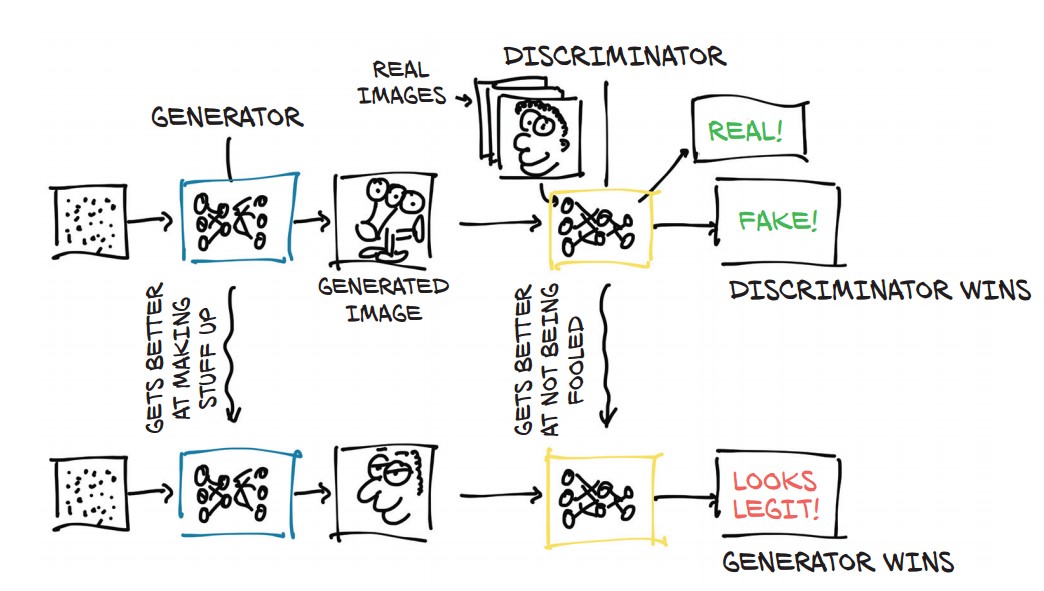
-
GAN (Generative Adversarial Network) consists of two competing neural networks:
- Generator (Painter) – Creates realistic images from random noise.
- Discriminator (Art Critic) – Distinguishes between real and generated images.
-
Objective:
- The generator tries to fool the discriminator into believing fake images are real.
- The discriminator learns to correctly classify real vs. fake images.
- Over time, both networks improve, leading to highly realistic synthetic images.
-
GANs have powerful applications in:
- Face generation (e.g., AI-generated human faces).
- Image translation (e.g., turning sketches into realistic landscapes).
- Audio synthesis (e.g., deep fake voice cloning).
- Text generation (e.g., realistic AI-generated writing).
CycleGAN: Transforming Images Between Domains
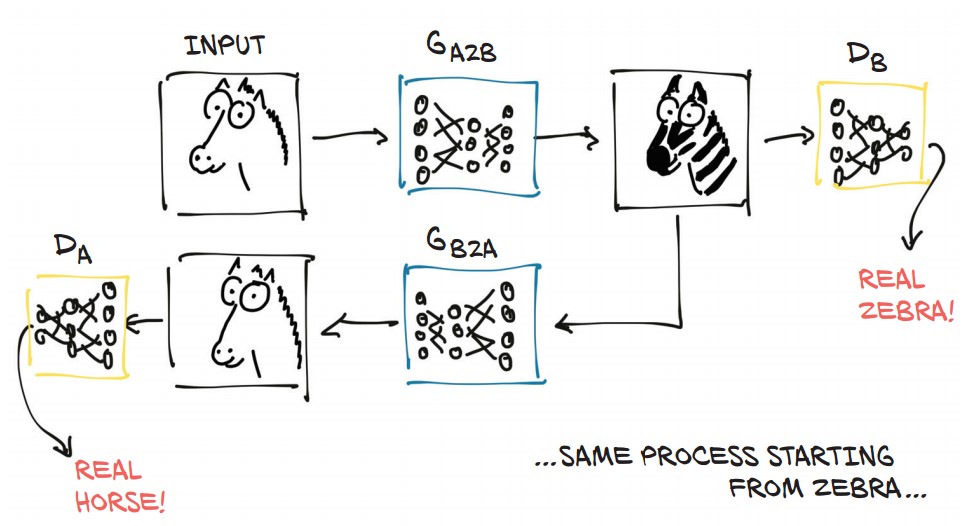
- CycleGAN extends GANs by allowing image-to-image translation without requiring paired examples.
- Example: Transforming horses into zebras and vice versa.
- How it works:
- Two generators: One for horse → zebra, another for zebra → horse.
- Two discriminators: One for detecting fake zebras, another for detecting fake horses.
- Cycle consistency: Converts an image to another domain and back, ensuring realism.
- Key Advantage: No need for perfectly aligned image pairs (e.g., a horse and zebra in the same pose).
Running a Pretrained CycleGAN Model (Horse to Zebra)
1. Load a Pretrained CycleGAN Generator
-
Define the generator using ResNet:
netG = ResNetGenerator() -
Load the pretrained model weights:
import torch model_path = '../data/p1ch2/horse2zebra_0.4.0.pth' model_data = torch.load(model_path) netG.load_state_dict(model_data) -
Set the model to evaluation mode:
netG.eval()
2. Preprocess an Input Image
-
Load an image of a horse:
from PIL import Image from torchvision import transforms img = Image.open("../data/p1ch2/horse.jpg") -
Apply preprocessing transformations:
preprocess = transforms.Compose([
    transforms.Resize(256),
    transforms.ToTensor()
])

img_t = preprocess(img)
batch_t = torch.unsqueeze(img_t, 0)
3. Generate the Fake Zebra Image
-
Run the generator on the image:
batch_out = netG(batch_t) -
Convert the output tensor back into an image:
out_t = (batch_out.data.squeeze() + 1.0) / 2.0
out_img = transforms.ToPILImage()(out_t)
out_img.show()

A Pretrained Network for Scene Description
Introduction to Image Captioning
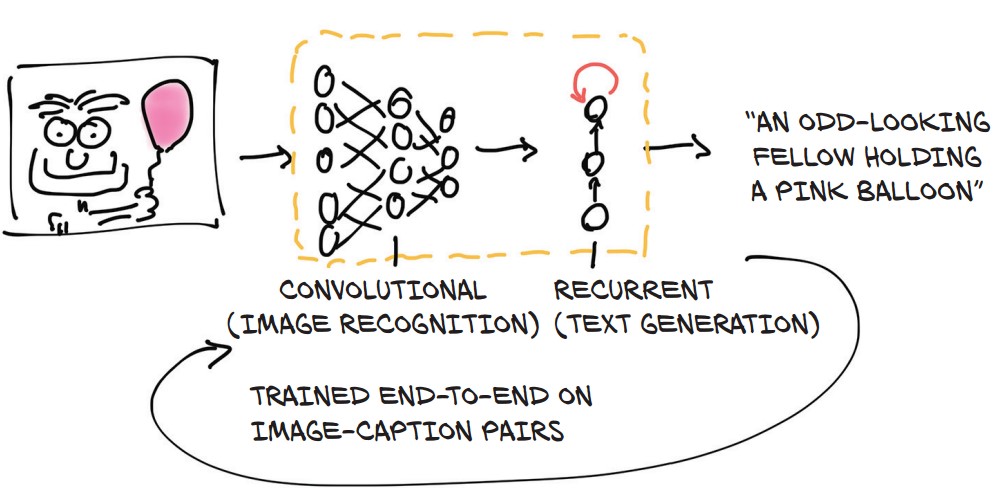
- Image captioning models generate natural language descriptions of images.
- The NeuralTalk2 model by Andrej Karpathy is a popular pretrained image-captioning model.
- This model takes an input image and produces a coherent sentence describing the scene.
How Image Captioning Works
- The model consists of two connected halves:
- Feature Extraction (CNN-based Network)
- Converts an image into a numerical representation (detecting objects like "cat," "table," "mouse").
- Sentence Generation (Recurrent Neural Network - RNN)
- Uses the extracted features to generate a sequence of words, forming a caption.
- Words are generated sequentially, with each word depending on the previous ones.
- Feature Extraction (CNN-based Network)
Running NeuralTalk2 in PyTorch
-
Repository: NeuralTalk2 PyTorch
-
Running the Captioning Model:
python eval.py --model ./data/FC/fc-model.pth \ --infos_path ./data/FC/fc-infos.pkl \ --image_folder ./data -
Example Output for
horse.jpg:- "A person riding a horse on a beach." (Correct caption)
Testing the Model with a Fake Image
- Input:
zebra.jpg(generated by CycleGAN fromhorse.jpg). - Output: "A group of zebras are standing in a field."
- The model correctly identified a zebra but mistakenly saw multiple zebras.
- Possible bias in the dataset: Zebras often appear in groups in training data.
- The rider was ignored because riders on zebras were not in the training dataset.
Key Takeaways
- Deep learning enables automated image captioning without hardcoded grammar rules.
- Training data biases affect model outputs (e.g., assuming zebras appear in groups).
- General-purpose architectures (CNNs + RNNs) can generate captions without prior domain knowledge.
Torch Hub: A Unified Interface for Pretrained Models
- Introduced in PyTorch 1.0, Torch Hub provides a standardized way to access pretrained models from GitHub repositories.
- Goal: Make loading third-party models as easy as loading models from TorchVision.
- Key Feature: No need to manually clone repositories—PyTorch handles downloading and model loading automatically.
How Torch Hub Works
-
Authors publish a model by adding a
hubconf.pyfile to the root of their GitHub repository. -
Example
hubconf.pystructure:dependencies = ['torch', 'math'] def some_entry_fn(*args, **kwargs): model = build_some_model(*args, **kwargs) return model def another_entry_fn(*args, **kwargs): model = build_another_model(*args, **kwargs) return model -
Components of
hubconf.py:dependencies: Lists required libraries.- Entry functions: Define how to initialize and return the model.
- Allows multiple entry points for different models or preprocessing steps.
Loading Models with Torch Hub
-
Example: Loading ResNet-18 from TorchVision’s GitHub repository:
import torch from torch import hub resnet18_model = hub.load('pytorch/vision:master', 'resnet18', pretrained=True)'pytorch/vision:master'→ Specifies repository and branch.'resnet18'→ Calls theresnet18function fromhubconf.py.pretrained=True→ Loads pretrained ImageNet weights.- Downloads model and stores it in
.torch/hub(default directory).
Advantages of Torch Hub
- Consistent Interface: Any model with
hubconf.pycan be loaded the same way. - No Cloning Required: Models can be downloaded and used directly.
- Flexible Entry Points:
- Can return models, preprocessing functions, or end-to-end pipelines.
- Some repositories may provide custom input transformations or label mappings.
Future of Torch Hub
- Still growing, but expected to become a key model-sharing platform.
- More researchers and developers are expected to adopt this format for sharing models.
- Searching GitHub for
hubconf.pycan help discover available models.
Torch Hub provides a standardized, flexible, and efficient way to access pretrained models, making it easier than ever to experiment with state-of-the-art deep learning architectures.
Conclusion
One thing that PyTorch does particularly right is providing those building blocks in the form of an essential toolset—PyTorch is not a very large library from an API perspective, especially when compared with other deep learning frameworks.